

Introduction
Laplink Everywhere monitors your Windows systems in the background and immediately communicates possible problems – detecting problems before they cause pain. In addition, Laplink Everywhere provides a comprehensive overview and deep insight into your Windows infrastructure. You can have all relevant system information displayed at any time: hardware, software, usage levels and health status of the hard disks, connection status, internal and external IP addresses and much more. Laplink Everywhere does not only monitor, but also actively helps you: with integrated Remote Desktop, you can always assist your users directly on their PC.
Tasks in Laplink Everywhere are administered via a web browser. Any current browser can be used on any Internet-enabled device. Because the application is fully web-based, no additional software or plug-ins are required. This also applies to Remote Desktop, which fully runs in the browser as well.
See whats going on inside your PCs and servers
Laplink Everywhere gives you a comprehensive overview of your Windows infrastructure. But the application also allows you to take a closer look as it displays all relevant system information whenever you want to see it: hardware, software, usage level and general condition of all hard disks, status of connections, internal and external IP addresses – just to name a few.
Spot problems before they hurt
Laplink Everywhere monitors your Windows systems behind the scenes and keeps you constantly informed of any possible problems. This can include anything from installation of new software to permanent monitoring of Windows Security to notification of failed updates. Laplink Everywhere can also let you know every time a USB disk is being connected and gives you the power to stop undesired changes from happening. At the press of a button, avoid potentially malicious software or prevent important documents from being removed.
Another common source of problems are hard disks. In that regard, Laplink Everywhere displays their current load and can warn you if they exceed a critical value. And by monitoring hard disk parameters, you’ll be given early warning about any disk that’s on the verge of crashing – no more overloaded servers bringing the entire company to a stop, and one more important way for you to avoid wasting valuable time!
Manage IT, help your workers and deliver a service
Laplink Everywhere doesn’t just monitor, it also provides active assistance: the integrated Remote Desktop allows you to help your users or customers directly on their PCs whenever the need arises. The only item you need is an active browser and an end device with an Internet connection. You’re at the airport and need to make a quick change in a setting for your accountant? Or want to see whats happening on a server? No problem, it can be done with just a few clicks (or “touches”)! Using secure encryption and two-factor authentication, your entire system will be “in your pocket” whenever and wherever you want it.
Laplink Everywhere makes it easy to create a large number of system settings, and with the Remote Console, you can even fall back on the good old reliable command line.
Thanks to the built-in multi-client capability of Laplink Everywhere, you can easily offer remote monitoring and management (RMM) as a service for your customers.
Laplink Everywhere in a nutshell
IT management from the cloud
No servers, no additional infrastructure or training required
Set up and ready for use in 5 minutes. No risk – just try it out
Data does not leave the company
Client management included for partners
Contract for order processing according to GDPR possible on request
Ready to use – only e-mail address needed for registration
Laplink Everywhere gives you a complete overview of your entire Windows infrastructure. With an easy-to-use web application, you are able track all the events in real time, and via dashboard or e-mail you will be notified instantly when an alarm is triggered.
Installation
You can add an unlimited amount of computers to your account. It makes no difference whether you are adding a desktop PC, a notebook, a server, or a virtual machine. Laplink Everywhere automatically recognizes each system during installation and provides the correct component.
Local Installation
Download the installation file on the computer you wish to add and start the program. Then just follow the setup instructions.
Installation across a network
We provide an MSI file for companies that you can use for automatic installation on your Windows systems.
Deploy Laplink Everywhere using Group Policies
In order to use Laplink Everywhere, the program must be installed on every computer. Installation can be carried out in two different ways:
- Manual installation on the computer using the installation file (EXE or MSI)
- Automatic roll-out of the installation file using the group policies of the Windows Active Directory (MSI file only)
Once installation is complete, there is no further need for user involvement. Updates and new apps will be automatically rolled out and provided by Laplink Everywhere.
The following will describe the necessary steps for rolling out Laplink Everywhere using group policies.
Requirements
Laplink Everywhere roll-out requires the following:
- You’re using a Windows Active Directory (AD).
- The computers where you want to install Laplink Everywhere are connected with the AD and there are enough permissions available for remote installation. You can find additional information in the Microsoft Article “Open Group Policy Software Installation”.
- You have downloaded your personalized MSI file from your Laplink Everywhere account. To do this, go in your account to “Add computer” and select the MSI file.
- The Microsoft .NET Framework 4.6.1 or higher is installed on the target computer. The download link can be found on this Microsoft Page.
Please note that the name of the MSI file may not be changed! Based on this name, the computer where installation is taking place will automatically be added to your account.
Creating the group policy for Laplink Everywhere
-
Start the group policy editor. You can find methods for opening this Microsoft TechNet Article.

-
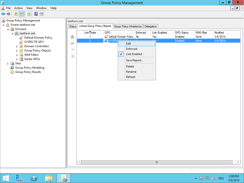
Create a new group policy for your domain and name it, for example, “LE GPO”

-
Select the policy and click “Edit”. You’ll now be moved into Group Policy Management.
-
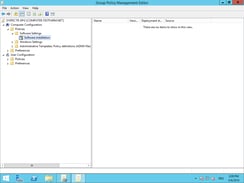
In Group Policy Management, select Computer Configuration > Policies > Software Settings > Software installation
-
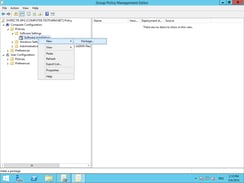
Right-click “Software installation”, select “New” > “Package…” from the menu and enter the path to the MSI installation file of Laplink Everywhere.
Assigning computers to the group policy
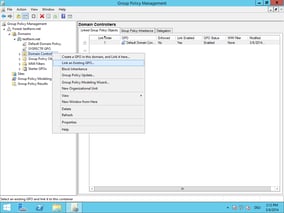
Once you’ve completed the previous steps, you can assign those computers where you want to install Laplink Everywhere to the group policy. Now select the organization unit with a right-click. Select “Link an existing GPO…” from the menu and select the group policy you created (in our example, “LE GPO”). Laplink Everywhere will soon be installed automatically on your computers and you’ll then be able to manage them in your account.
Main view
Start
On the Laplink Everywhere Start page, you get an overview of your computers, computer groups and current events as well their status and operating system version. You can also see at a glance which systems have generated Warnings or Problems.
Summary
This gives you an overview of your computers, their online status and the number of open/new events. A bar diagram gives you a history of the last nine days.
Favorites
On the Start page, your favorite computers and groups are displayed. When you add a new computer to your account, it is automatically marked as a favorite. In the Settings section, you can configure this and add or remove as you please.
![]() The All Computers panel takes you to an overview of all your systems. Using the plus field
The All Computers panel takes you to an overview of all your systems. Using the plus field
you can add a new computer to your account.
News and Changelog
Here you get the latest news surrounding Laplink Everywhere.
Current events
This is a list of new and open events that require your attention. You can mark them as read or deleted to remove them from the list.
![]() The All Events panel brings you to an overview of all events.
The All Events panel brings you to an overview of all events.
Status messages
Laplink Everywhere can display the following:
![]() Problem (red) - At least one major Problem exists. This has priority over Warnings!
Problem (red) - At least one major Problem exists. This has priority over Warnings!
![]() Warning (yellow) - At least one Warning exists.
Warning (yellow) - At least one Warning exists.
![]() OK (green) - No existing messages.
OK (green) - No existing messages.
![]() Hourglass (blue) - An hourglass indicates that the information from that computer is currently being obtained and processed.
Hourglass (blue) - An hourglass indicates that the information from that computer is currently being obtained and processed.
Navigation bar
In the top navigation bar, you can recognize by the Online Symbol ![]() how many computers are online. Clicking on the symbol takes you to the statistics page, which contains valuable information about your computer and operating system.
how many computers are online. Clicking on the symbol takes you to the statistics page, which contains valuable information about your computer and operating system.
News
Under Notifications, you'll find the latest messages about Laplink Everywhere.
Settings
In the settings of the start overview (Dashboard), you can set which areas should be displayed:
- Summary - This provides an overview of your computers, their online status and number of new/open events. A bar chart gives you a history of the last nine days.
- Favorites - You can select the computers that are displayed on your dashboard. This is found in the settings by each computer.
- News and Changelog - Find the latest news about Laplink Everywhere here.
- Current events - This is a list of new or open events that require your attention. You can mark them as read or deleted to remove them from the list.
Feedback
Over our Feedback Form you can submit support questions or give us your feedback and suggestions. Select the type of contact (Feedback or Support), fill out a subject and text and press Send. We will contact you promptly!
Account
Under your Account page you can find all important information pertaining to your Laplink Everywhere account. There you can manage your profile, security settings, licenses and privileges, all accessible over the menu on the left.
User Account
Here you’ll find your e-mail address and personal data. You can enter and change your personal data as you wish.
Appearance
Here you can upload your personal logo for the Browser App and PDF reports.
System Settings
Here you can set your language, time zone and measurement system (metric or US).
About
Along with copyright information you can verify here what current version of Laplink Everywhere you are running.
Delete account
If you no longer wish to use Laplink Everywhere, you can permanently delete the account and all corresponding data and privileges. Please follow the security instructions provided for deleting an account.
Change E-mail
Here is where you can change your e-mail address. Your account is linked to your e-mail address. This means that you need to use your e-mail address to log in. In case you change your address, your login will be changed accordingly. Please keep the above in mind whenever you log in after changing your e-mail address.
Account security
Change Password
Here’s where you can change your password. Please follow the instructions after you’ve clicked Next.
Two-factor authentication
Two-factor authentication protects your account against unauthorized access. In addition to your username and password, a second factor is required in order to confirm your identity to the system. This will require your installing a so-called "Authenticator" app on your mobile phone that will be connected to your account. Whenever requested, you'll be able to see this code in the app and then enter it. These apps are available for all mobile telephones and implement the so-called "Time-Based One-Time Password Algorithm", a feature that was defined by the Internet Engineering Task Force (IETF) in RFC 6238.
Installation PIN
The installation of Laplink Everywhere on a computer requires this PIN to increase the security of your account.
Sessions
Browsers registered in your account are protocolled in the sessions. If you wish to end a session, click on the X on the right.
Account log-ins
Here you can see your sign-in history, including the dates and times that your Laplink Everywhere account was used. You can also see the browser and IP addresses that were used during account access.
Sessions
Browsers registered in your account are protocolled in the sessions. If you wish to end a session, click on the X on the right.
Settings
Here you can set your language, time zone and measurement system (metric or US). You can also configure your personal logo for PDF reports.
Computers
Computers
This page shows your computers and their recent events. You can see at a glance which systems have a problem
![]() or a warning
or a warning
![]() . Computers with a green status
. Computers with a green status
![]() are fine. If the status is grey, for example
are fine. If the status is grey, for example ![]() then this system is either turned off or currently unavailable. An hourglass indicates that the information from that computer is currently being obtained and processed
then this system is either turned off or currently unavailable. An hourglass indicates that the information from that computer is currently being obtained and processed
Views
You can display your computers and groups in two ways:
- Display as tiles
- Display as a list
- Display as Groups
Both views deliver brief information on the computer (operating system) or group (number of computers) as well as the respective status.
The All Computers panel takes you to an overview page of all your systems. Using the filter. you can select which type of computers and groups should be displayed.
Add computer
With + Add computer, you can add new computers any time you like. Simply click on the symbol and you get to the page with the installation file.
Apps
Enable or disable apps for each computer. Inactive apps are hidden from the computer overview.
Delete computer
Here you can delete one or multiple computers from your Laplink Everywhere account. To do so, you will need a TAN that will be sent to you by e-mail.
You must also remove the Laplink Everywhere Client from your computer. To do so, go to your computer's control panel and uninstall Laplink Everywhere.
Details
Overview
This page is divided into three parts:
Information on the Computer - Here you can get an overview of the operating system and hardware as well as the IP and connection data
Apps - The apps available for the computers and their status, indicated accordingly (yellow and red symbols). If there are no warnings or problems, the app has no symbol. This should be the "norm".
Last Events - The last events occurring on the computer
Actions
On the upper right above the computer information, you'll find an icon menu with up to six possible buttons:
Power (only available if the computer is on) - You can shut down or restart the computer. A TAN received by e-mail is required for this task.
Note - Here you can save notes on the respective computer
Computer-Tags - Shows computer tags and enables assignment from this tag
Send message - Opens a dialog for sending a message to the computer so that this message can be displayed on the monitor – just like the good old "net send"
Report - Creates a PDF with information about the computer
Settings - Changes to the settings for the computer
Groups
You can organize your computers into groups to simplify management. Here you can select whether a computer should belong to a group and assign it accordingly.
Settings
Alias
An alternate name for the computer that you can choose by yourself. It will only be used to reference the device in Laplink Everywhere and has no effect on the computer's official network name in Windows.
Show computer on Dashboard
You can display the computer on the Dashboard (where it will also be designated as a "Favorite").
Enable Insider Channel participation for the computer
By enabling Insider Channel participation, this computer will have access to new and enhanced apps before they are made available to the general public. You would be able to use and test them. However, note that these apps may not fully function or contain errors. For that reason we do not recommend them for use on systems that are of critical importance to you.
Delete computer
Here you can delete the computer from your Laplink Everywhere account.
You must also remove the Laplink Everywhere Client from your computer. To do so, go to your computer's control panel and uninstall Laplink Everywhere.
Stats
On this page, you can find statistical information on your systems:
- List all computers - Status, Name and operating system as well as connected groups and first and last connection
- Operating System - How are Windows versions spread across your systems? By clicking on the operating system version, the appropriate computer name is displayed.
- Type - How are various computer types (Desktop PCs, Servers, virtual machines etc.) spread across your systems? By clicking on the type version, the appropriate computer name is displayed.
Notifications
On this page, you can individually configure the messages sent by Laplink Everywhere. Select the appropriate app and then the type of message you want to receive (Information, Warnings, or Problems). Every message generates an e-mail. If you have privileges for other accounts, you can also set them individually by selecting the account required.
Events
This gives you an overview of all events on your system. You can limit the information displayed by time period, specific computers and also by using filters. By clicking on the small arrow to the right, you can open up events and read the details. By clicking on the computer name, all events for this computer will be shown, and one click on an event itself takes you to the app from where the event originated.
Mark an event as read or solved
Most events are automatically marked as resolved as soon as the problem has been solved. For instance, Windows Updates are marked as resolved as soon as they are installed. You can recognize this by the small tick shown next to the status symbol.
If you want to do this manually, click on the status symbol of the event and then select the appropriate option. A read event is marked with a small letter symbol.
Computer-Stream
Last Events
This gives you an overview of all events on your system. You can limit the information displayed by time period, specific computers and also by using filters. By clicking on the small arrow to the right, you can open up events and read the details. By clicking on the computer name, all events for this computer will be shown, and one click on an event itself takes you to the app from where the event originated.
Mark an event as read or solved
Most events are automatically marked as resolved as soon as the problem has been solved. For instance, Windows Updates for are marked as resolved as soon as they are installed. You can recognize this by the small tick shown next to the status symbol.
If you want to do this manually, click on the status symbol of the event and then select the appropriate option. A read event is marked with a small letter symbol.
Groups
Learn more about different Laplink Everywhere versions and compare the features here
With groups, you can organize your computers and therefore create settings for an entire group of computers. Likewise, you can get information about an entire group. Simply click on a group tile to see its overview. You can also create a new group using the "Create new group" option. In the "Overview" section of the group, you will see a summary of the group with information about the number of included computers and which computer that last connection was made to. In the list of computers, you can also read about the last event that occurred on the computer as well as its current status.
The group "All computers" is always automatically created by the system and includes every computer in your account.
Computer Tags
Laplink Everywhere uses tags to add machines to a group. From a "tag" you can create a group by clicking on the "tag". As soon as you set a "day" for a computer, this computer is added to the group and receives the corresponding group settings. "Computer Tags" displays the computer tags and lets you assign these tags to the machines of your choice. By clicking on a "tag", you will be directly taken to the relevant tag list. There you can switch to the corresponding computer group or create a new group right away if it does not already exist.
Apps
Introduction
Laplink Everywhere offers included and paid apps. The included apps are pre-installed as a standard and can be used immediately. If you no longer want to use an app, you can easily uninstall it.
Paid apps must be purchased in advance from our online store and require a valid license. This is automatically transmitted and activated by the system at the time of purchase, so you don't have to worry about it.
You can enable or disable apps for a machine or group of machines. Activation may require the installation of an additional component which then would automatically occur in the background. A deactivation removes this component.
Included Apps
The following apps are included in Laplink Everywhere:
| App | Description |
|---|---|
| Hardware | Inventory and display of all essential components of your Windows systems such as CPU, memory, disks, etc. Includes the option for monitoring sensors for the CPU temperature. |
| Software | Inventory and view of installed programs as well as their versions. Offers the option for uninstalling programs provided they support Windows standards. |
| Windows Security | Display and monitoring of the most important Windows security settings. Settings can be configured and monitored remotely so that in the event of any security gaps, corresponding notifications can be generated. |
| Windows Updates | Status and management of Windows updates with numerous configuration options for keeping Windows up-to-date. |
| Storage Usage | Display and monitoring of the space on integrated storage devices such as hard disks and SSDs. Using threshold values, it’s possible to learn early enough about an impending capacity problem and react accordingly. |
| Processes and Services | View of running processes as well as options for preventing certain processes from starting or reporting about their start and/or end. |
| Disk Cleanup | Identification and removal of useless files to save space. |
| Drive Monitoring | Monitoring of S.M.A.R.T values on disks and automatic notification if values deteriorate to such an extent that a crash is possible. |
| USB Storage | View of connected USB storage devices and options for preventing connection of USB devices entirely to increase system security. |
| Process Watcher | View of running processes as well as options for preventing certain processes from starting or reporting about their start and/or end. |
| PowerShell Scripts | A very easy option for managing PowerShell scripts and running them manually or automatically on the computer. Results can be monitored and corresponding notifications generated. This app is supplemented by a central library containing all PowerShell scripts for the account. |
| Remote Console | Open a command on a remote computer to take a quick look at its permissions or help the user with any problems. |
| Remote Desktop | Immediate intervention possible from any device with an internet connection. No need for any additional software, browser plug-ins or DLL Injections. Whenever requested, work together with the user of the device involved. |
Premium Apps
The following apps are subject to a fee and must be purchased before use.
| Premium App | Description |
|---|---|
| PCmover | Installation and management of PC deployment and refreshes to easily manage the entire lifecycle of your PC fleet. |
| Defrag | Installation and management of Defrag for automatic optimization of performance. This helps keep speed up to its maximum level on both the system and Windows to get the most out of hardware. |
Hardware
Overview
The Hardware app provides a compact view of all your system’s components. A detailed cut-out containing the most important system information can be seen in the top section of the computer view. If you’re looking to find more detailed information about any particular component, just open the section you want. The button on the right can be used to open and close the view of all components.
Components
The following components will be displayed if available:
- Motherboard
- Processor
- Memory
- Graphic
- Optical drive
- Audio
- Network
- BIOS
- Device classes
Device classes
Device classes include all devices that are installed as either hardware or software. These are not only peripherals such as a printer, mouse or keyboard but any virtual devices as well. This list can be very long so it might be advisable to use the browser’s integrated search feature if you’re looking for a certain driver. The search can normally be accessed by pressing Ctrl+F.
Software
In the Software app, you can glance over what software is installed on your system including the version, date installed and the required hard disk space for the programs.
Uninstalling programs
Laplink Everywhere allows you to uninstall some programs. You can recognize these by the button showing a cross, located in the right column. To uninstall a program remotely, it will need to have a Windows-compatible uninstallation routine. This is the case with most modern programs using the Microsoft Installer (MSI). Some programs cannot be uninstalled with this app because they might, for example, require specific user information. To remove programs like these, you should use the Remote Desktop app, which is also available in Laplink Everywhere.
Windows Security
This app informs you about the security status of your systems. Laplink Everywhere checks the most important Windows application points and warns you accordingly should any problems be detected. Under Causes and Solutions, you can find detailed descriptions of warnings and solutions for Windows security issues.
Settings
Under Settings, you can activate or deactivate monitoring options. This is particularly helpful if you no longer want to be sent messages for specific events.
Monitor Windows administrator account security
Administrator accounts must have a password. Without it, they are considered unsafe because these accounts can be easily misused and contain a large number of permissions.
Monitor Windows guest account status
An active guest account poses a risk because they can be used to access systems externally. This option verifies whether the account is disabled.
Monitor activation of Windows User Account Control (UAC)
The UAC prevents unauthorized processes from being run with extensive permissions. A Windows dialog will normally appear before processes requiring administrator permissions can begin. This prevents potentially harmful software from being started unintentionally.
Monitor safeguarding of Internet security settings
Windows monitors many security settings whenever the Internet is accessed. Here’s where these system settings can be checked to make sure they’re not disabled on the computer.
Monitor antivirus application
An active antivirus program protects against malware that might enter a computer. Here’s where you can verify that a current antivirus solution from a third-party manufacturer or Microsoft Defender is active.
Monitor anti-spyware activities
An active anti-spyware program protects against phishers and bugs that might enter a computer. Here’s where you can check if the computer has a current anti-spyware solution from a third-party manufacturer or Microsoft installed and enabled.
Monitor firewall status
A firewall serves as a barrier against attacks from the local network and the Internet. It is one of the most important defenders of your computer which is why Microsoft has a corresponding device of its own.
Monitor activation of Windows Automatic Updates
Microsoft updates Windows and other products, such as Microsoft Office, at regular intervals to remove errors and vulnerabilities against attacks. Enabling automatic updates is of utmost importance. Vulnerabilities are very often exploited by hackers and it’s the Microsoft updates that finally reveal them.
Hardware vulnerability: check firmware version
This is where Meltdown and Spectre will be checked to make sure the necessary updates of the firmware are installed as protection against security gaps detected in processors.
Hardware vulnerability: check Windows updates
This is where Meltdown and Spectre will be checked to make sure the necessary Windows updates are installed as protection against security gaps detected in processors.
Hardware vulnerability: check settings
To protect against the Meltdown and Spectre security gaps discovered in processors, a check is carried out here to determine whether the corresponding Windows settings are correctly set.
Windows Updates
Out-of-date operating systems are one of the most common points of attack for hackers. That is why it is particularly important for your systems to always have the very latest Windows and other Microsoft updates installed. In this app, Laplink Everywhere lists the updates that are available and you can then decide if and when they should be installed. You can customize the update overview in Settings.
Important Note: Laplink Everywhere immediately runs Updates for Windows Defender automatically as soon as they become available, provided you have activated the automatic installation of Windows Updates on the computer. Windows only installs these updates after a given time interval, which means security gaps can open up. Automatic installation prevents that danger from arising.
Disk usage
Hard Disk Drives
This app lets you monitor the usage capacity of your disks. You can be warned in advance of space issues, when data can no longer be saved or if Windows is incorrect or running slow.
Overview
This view contains a list of all volumes (hard disks, SSDs etc), their partitions with name and current usage. You can activate or deactivate the monitoring for each partition using the button on the right.
Processes and Services
The Process Watcher in Laplink Everywhere informs you if an unwanted process has started or a monitored process is no longer running. You can set every program, process and service as a process. For both options, go to Settings and enter the desired process name that you want to monitor. Please note that you can either use the file name (for example calc.exe or notepad.exe) or also the display name (for example Computer or Editor).
DiskCleaner
DiskCleaner allows you to delete unneeded files and thereby create more space on your hard disk. DiskCleaner concentrates exclusively on files that are in no way required for the running of the system or any programs. Blocked temporary files will not be deleted.
Minimum age of files for the Recycle Bin
You can use the settings to specify the minimum age of files for the Recycle Bin that DiskCleaner should consider. This helps you avoid removing recent files from the Recycle Bin that have been deleted by mistake.
Drive Monitoring
This app monitors the health of your hard disks or SSDs. You will be informed as soon as a temperature set by you is exceeded or problems are reported via S.M.A.R.T.
Possible problem causes
High temperatures could indicate a problem with ventilation and can lead to the shutdown or crash of a disk. In such cases please check the air outlet is clear (air exhaust louvre, dust, etc.) and that the room temperature is within the normal range.
USB Storage
Connection of USB storage devices (e.g. flash drives, disks or cell phones) brings with it the risk of faulty software being installed on the system and of valuable data being transferred outside of the system and taken away.
Settings
Under settings,
you can instruct Laplink Everywhere to expressly forbid the connection of a particular USB device while still allowing other devices such as a printer or mouse.
Process Watcher
The Process Watcher in Laplink Everywhere informs you if an unwanted process has started or a monitored process is no longer running. You can set every program, process and service as a process. For both options, go to Settings and enter the desired process name that you want to monitor. Please note that you can either use the file name (for example calc.exe or notepad.exe) or also the display name (for example Computer or Editor).
PowerShell
Overview
Laplink Everywhere provides a very easy way to run PowerShell scripts on remote computers and store and evaluate the results centrally in the program. It does not matter if the computer is connected to the network or part of a specific domain or work group. The times when you had to file logs of PowerShell scripts on a file server and evaluate them laboriously is a thing of the past. Laplink Everywhere monitors your systems and notifies you as soon as a script identifies a problem - 24 hours, 7 days a week. This not only saves time and nerves, but also a lot of money. In fact, PowerShell works in Laplink Everywhere just as if you were working directly on the computer. In addition, Laplink Everywhere offers the evaluation of the outcome of the PowerShell script and scheduling, as you may know from Linux crontab. This makes it possible to execute PowerShell scripts at specific times, without having to use the Windows Task Scheduler. With the help of the PowerShell scripting app, you are no longer bound to the restrictions of popular IT monitoring solutions. It is finally possible to customize and extend your wishes according to your IT monitoring!
Create and manage scripts
PowerShell scripts can be fully managed in Laplink Everywhere via the web application. You can create, edit, activate and deactivate, and delete scripts. In other words, you can create, edit and see the results of a script for one of your computers from virtually anywhere in the world. Once created, scripts can be applied to any other computer.
Evaluation of the results of PowerShell scripts
Each script gives provides a result value (so-called. exit code) at the end. This value influences the status of your computer and is interpreted as follows:
- exit 0 (or no exit code was delivered): Status OK (green)
- exit 1: Status Warning (yellow)
- exit 2 or greater: Status Problem (red)
At the same time, the latest issue line of your script is up to 2,048 characters long and stored and recorded in the history of your computer. Of course, you can subscribe to an alert that sends you the exit code and that issue via mail. That way you can see see immediately if an automated script signals a warning or an issue.
Execution of scripts
The execution of scripts is possible as follows:
- Manually - manual execution using Laplink Everywhere
- Automatically at startup - at every system startup, the script runs automatically
- Automatically at specific times - the times can be set via crontab syntax
Syntax of scheduling
If the user-defined execution is enabled, the scripts can be run automatically. The line consists of the following 5 fields: [Minutes] [hours] [days] [months] [weekdays]
Definition of the fields
FieldValid valuesNotesminutes td>0...59 | * for every minute hours0...23 | * for every hourdays1...31 | * for every day, if days and weekdays are used together, then they are evaluated together, but individually (see special case in the examples)months1...12 | * for every month weekdays0...7 | * for each weekday 0 or 7 stand for Sunday
Examples of scheduling with Laplink Everywhere
[minutes][hours][days][months][weekdays]explanation100***Every day at ten minutes after midnight.100**3Every Wednesday ten minutes after midnight.0****Every day, about every hour*/154-16**6,7every 15 minutes between 4 a.m. and 4 p.m., but only on Saturdays and Sundays.*****Every minute (minimum adjustment)*141-1051In May from the 1st to 10th and every Monday in May at 2 p.m.; this is a special case, when days and weekdays are shared
Compatibility
The PowerShell is available in different versions. To find out which version is installed on your system, you can check the Laplink Everywhere Dashboard. Basically:
- Version 1.0 is obsolete and should no longer be used.
- Version 2.0 is installed by default in Windows 7. It can be downloaded and installed for free for Windows XP, Windows Server 2003 and Windows Vista.
- Version 3.0 is the standard for Windows 8. They are also available for Windows 7 SP1 and Windows Server 2008 R2 SP1.
- Version 4.0 is the latest version and can be installed as part of Windows Management Framework 4.0.
The different versions have partly different syntax and functions so that adjustments to the scripts for each version may be necessary.
Script library
The script library is the central location for your PowerShell scripts. All scripts are stored here and can be edited, deleted and assigned to computers or even revoked. If you want to create a new script, simply click on the appropriate button. You can also find information here on the creation date of scripts and when they were last edited.
Add script
Always give your scripts a descriptive name! You can choose any name you like – it will not subsequently be used as the filename for the execution of the script. The file name for execution is assigned by the system independently.
Entering PowerShell scripts is done through a text editor. This helps you when entering a script by using a so-called Syntax Highlighting. This means that the relevant keywords of PowerShell are color-highlighted. You can edit as much as you like in the way that you undoubtedly know from other text editors, and you can also paste scripts from your clipboard or enter excerpts from your computer into the textbox.
With the execution, you determine when the script should be executed on the target machine. You have the following options:
- Manual execution - You can run the script manually at any time
- Manual execution – run now - You can run the script manually at any time; it will be executed once immediately when you press Save
- Execution at startup - The script runs at every system start
- Scheduled execution - Use crontab syntax to create a schedule. For the syntax you can find a detailed description in the Help section on the main page of the PowerShell script app.
By saving the script, it will either be executed immediately or activated once you select it. For manual scripts (default setting), the scripts are only executed when you explicitly request it.
Remote Console
The Remote Console lets you open a Windows command prompt with administrator permissions on a remote computer. Just as you could under Windows, you'll be able to run scripts on the remote computer and follow them in the browser. To end a session, either enter the command exit or close the window.
Remote Desktop
Remote Desktop lets you make a direct connection with a remote computer. Once successfully approved or accepted by the remote user, you can control the computer with your mouse and keyboard. To send specific instructions, use the "Actions" button. The overview lets you set whether the display should be scaled or not, and if a computer has several monitors, you can switch between them.
End the connection
When ending a connection, you can send a message to the user and decide whether to block the computer (which is normally the case).
Defrag
Defrag defragments your hard disks and thereby optimizes the speed with which they can be accessed. With every write process, the file system splits files into multiple pieces and then scatters them across free sectors of the hard disk. Because of this, accessing these files requires that they be found and then merged. Searching for them requires physical movement of the read-write head and this costs time. Once files are combined and organized in consecutive order, the time needed for accessing them is reduced dramatically. This speeds up not only the read-write processes but saves wear on the hard disk’s mechanics.
Installation
In order for use Defrag, the current version will have to be installed on the target system. If this is not already the case, Laplink Everywhere provides a fully automatic installation. Confirm when you want to use it and wait a moment until installation is completed. Once that’s done, you’ll see a preview of your drives and you can then carry out any desired actions.
Actions
Analysis
Analysis will examine partitions on the target computer and provide an overview of their current level of fragmentation as well as the distribution of files on each partition. Red blocks symbolize fragmented files; blue blocks defragmented.
Defragment
After you start defragmentation for a partition, you’ll receive status updates at regular intervals and so you'll be able to follow how much progress the defragmentation is making.
Stop
You can use the “Stop“ feature to stop an analysis or defragmentation. In just a few seconds, the action will be ended.
Tasks (Premium Apps exclusive)
Partitions
Select the partition(s) for which you want to create a defragmentation job.
Execution
Set whether the task should be carried out once on a specific date or whether it should be done weekly on one or more/all days of the week. Here you can also specify whether the job should be carried out on the next possible date if a start was not possible on the scheduled date (e.g. because the computer was switched off).
Settings
Automatic defragmentation
- Automatic defragmentation in the background - This option allows Defrag itself to select the best methods and times for defragmenting, depending on various system parameters that are regularly determined automatically. The ActivityMonitor regularly determines the system’s level of capacity. It controls Defrag’s power requirement during defragmentation and adjusts it to the computer’s current status. This enables you to continue working undisturbed while defragmentation is being run in the background.
- Optimize when the user is away (when the screensaver is active) - Here’s where you can set Defrag to always start when the computer is not being used and the screensaver is active.
Additional automatic optimizations
- Optimize SSDs regularly using TRIM - Defrag can optimize Solid State Drives (SSDs) of any make, even under Windows XP and Vista. As a result, write accesses on SSDs are measurably faster and premature effects of wear out avoided.
- Regularly delete free space on hard disks - Deleted files can be restored using very simple methods. If you wish to avoid this, let Defrag delete free space in addition to defragmenting so that recovery of data is made impossible.
- Regular Thin Provisioning optimization - Using this feature on virtual hard disks/systems results in their regaining unused space for improved memory capacity.
Microsoft Defender Antivirus
Protection against malicious software must always be up-to-date and, above all, active. With the "Microsoft Defender Antivirus" app, you can control Microsoft Defender Antivirus, integrated in Windows, centrally and easily. At a glance, you get the current status of the virus definitions, detected threats and the times of the last scans.
Overview
On the overview page, you can see immediately whether a system is being protected and how, and whether threats have been found. The times of the last quick scan and the last full scan are also displayed. You can also start a quick scan or a full scan here.
Scheduled Scans
Under "Scheduled Scans", you can create one-off or regular tasks for scans and select the method ("Quick Scan" or "Full Scan") as well as choosing the days of the week and the time for each scheduled task.
Reports
The latest scans and threats found are documented in a table here. You can get further information by clicking on the entries.
Settings
In the Settings, you can activate real-time protection with just one click should it not already be active. For security reasons, it is not possible to deactivate this in Laplink Everywhere. If you install another antivirus solution, Defender is automatically deactivated. If you then uninstall or deactivate another AV solution, Defender should reactivate at that point as a default. If this is not the case, you can intervene here accordingly.
Intel AMT
Power Options
- Reset is like pressing the reset button (AMT)
- Shutdown is a regular OS shutdown
- “Power off” is like switching off the power (AMT)
- “Power Cycle” is a “Power off” followed by a power on.
- ( A “Power on” button will be displayed only if the machine is provisioned and powered off )
| Label | Description |
| Shutdown | OS: Graceful shutdown. Applications are being closed by the OS |
| Restart | OS: Graceful shutdown. Applications are being closed by the OS |
| Power off | AMT: Immediately Power off, bypassing the OS |
| Reset | AMT: Immediately reset (restart), bypassing the OS |
| Sleep | OS: Graceful sleep |
| Hibernate | OS: Graceful hibernation |
| Power cycle | AMT: Power off then Power on |
Managed Accounts
Learn more about different Laplink Everywhere versions and compare the features here
General
In this section, you can create and manage accounts for your customers. To create a new account, simply enter an appropriate name and click Add.
Current account
You can always see which account you are currently in as it either shows as „“Active“ or you look top right – you will see your user name if you are in your account, or your username@account, meaning you are in a customer account.
Switch between accounts
You can now switch between accounts and then create individual settings. Click on your username and select the sub-account from the list under your name (they are listed between “Notifications“ and “Feedback“).
Computer
Add computer
To add comptuers to your sub-accounts, go to the appropriate account and you will be directed to the start page. There you can click on “Add Computer“ and can download either the .msi or.exe file. Install it onto the computer that you intend to monitor under the account. Please note: Because your main and sub-accounts are entirely independent of each other, you will only see an added computer in the account from which the .exe or .msi file originates.
Access credentials
Set access credentials
You can assign separate access authorizations to your accounts, thus ensuring that access authorizations only apply to the account for which they are relevant. For information on access permissions, click in the account tile on menu (⋮) and menu item "Access permissions".
Credential
This is a paid option that requires an Enterprise license.
Learn more about different Laplink Everywhere versions and compare the features here
Laplink Everywhere offers the option of managing and administering accounts. This means you can also manage someone else's account or give someone else permission to manage yours.
Available Credentials
This list shows you the accounts where you have credentials. When selecting another account, you’ll be able to manage its computers and settings. Please note that making any changes will require write credentials.
Change back to your account
When you want to stop managing a different account, select the item "Exit Account" from the menu or return to the Settings page and select your own account from the list.
Add user account
If you want to give someone else access rights to your account and thereby extend control over your computers, enter their e-mail address here. Please note that the e-mail address you enter must correspond to an existing Laplink Everywhere account! Once this is done, you may select the credentials:
- Read credentials - The user can access status information about your computer but cannot change any settings
- Write credentials - The user has the same power you do over all settings
The user will then receive a message concerning the approved credentials. Note: Users whom you invite to manage your account cannot see your profile data on these pages. This data is only visible to the account holder.
Administering accounts
Learn more about different Syspectr versions and compyre the features here
O&O Syspectr offers the option of managing and administering accounts. This means you can also manage someone else's account or give someone else permission to manage yours.
Available Credentials
This list shows you the accounts where you have credentials. When selecting another account, you’ll be able to manage its computers and settings. Please note that making any changes will require write credentials.
Change back to your account
When you want to stop managing a different account, select the item "Exit Account" from the menu. Or return to the settings page and select your own account from the list.
Add user account
If you want to give someone else access rights to your account and thereby extend control over your computers, enter their email address here. Please note that the email address you enter must correspond to an existing O&O-Syspectr account! Once this is done you may select the credentials: - Read credentials - The user can access status information about your computer but cannot change any settings
- Write credentials - The user has the same power you do over all settings
The user will then receive a message concerning the approved credentials. Note: Users you invite to manage your account can not see your profile data on these pages. This data is only visible to the account holder.
User Management
This is a paid option that requires an Enterprise license.
Learn more about different Laplink Everywhere versions and compare the features here
General
In this area you can create and manage additional user accounts, e.g. for your employees or colleagues. They then have access to the computers managed with your Laplink Everywhere account and optionally for certain or all managed accounts, e.g. customers or clients.
To create a new user account, enter a valid e-mail, optionally your first name and surname as well as a description so that you can later identify the account more easily.
Confirm new user accounts
New users that you create here require a valid e-mail address, which must be confirmed before logging in for the first time. Along with the new registration, an e-mail with a confirmation link is sent. After confirmation, the new user must choose a secure password.
Grant access to one or more managed accounts
You can choose which accounts or clients the new user can access. At least one account must be entered here; this is your main account by default.
Log in to the newly created user account
When logging in for the first time, the newly created user sees a welcome message and an overview of all accounts/clients that can be accessed. These users are not allowed to create any further clients or accounts but can only switch between the accounts assigned to them.
Edit and delete users
You can change all user data except for the e-mail and grant or revoke access to managed accounts and other accounts later. You can also delete the users you have created.
License management
Laplink Everywhere allows you to manage your own software licenses.
Own licenses
Use Laplink Everywhere to manage your software licenses securely. You can enter, edit and delete your software licenses yourself. This means that you always have the right license at hand for your software inventory.
Your Laplink licenses
In this list you can see all the licenses that you have bought from Laplink Software.
Please note: When ordering in the online shop, you must use the same verified e-mail address that you use to log into Laplink Everywhere. These licenses cannot be deleted, but it is possible to hide the licenses in the list.
