

Frequently Asked Questions
Here you can find the most commonly asked questions regarding Laplink Everywhere. Should you not find the answer to your particular question here, then please contact us. We are always happy to help!
User Account
Managed Service Provider (MSP) features are available to anyone with a Laplink Everywhere account. After login, you can click your name at the upper right in the program window and then click Managed Accounts. Once there, you’ll be able to set up accounts for individual clients. You can then follow the procedure for installing Laplink Everywhere on client computers and configuring the settings as you see fit.
If you forget your password, you can have a new (temporary) one sent to your e-mail address. Enter your e-mail here and confirm the resetting of your password.
If you wish to change your password, proceed as follows:
- Log in to your account.
- Click “My Account” .
- Click “Security Settings”
- Enter your new password and confirm it.
You must then log in using the new password you created.
Should you wish to change the e-mail address assigned to your account, please send us a message from within your Laplink Everywhere account. We will then contact you to go through the next steps.
Yes, you can allow another Laplink Everywhere user to access your account. You have the option of giving another user read-only or writing permissions to your account.
Read-only permissions will allow another user to see your data but not change any settings. If you wish to allow this, give the user writing permissions. This can be very useful when an external IT consultant is called in to help resolve a problem.
These permissions can be canceled whenever you wish.
Two-factor authentication protects your account against unauthorized access. In addition to your username and password, a second factor is required in order to confirm your identity to the system. This will require your installing a so-called “Authenticator” app on your mobile phone that will be connected to your account. Whenever requested, you’ll be able to see this code in the app and then enter it.
These apps are available for all mobile telephones and implement the so-called “Time-Based One-Time Password Algorithm”, that was defined by the Internet Engineering Task Force (IETF) in RFC 6238.
- For Android, iOS and BlackBerry: Google Authenticator
- For Windows Phone: Microsoft Authenticator
Activating the two-factor authentication
- Log in to your Laplink Everywhere account at everywhere.laplink.com/login.
- Go to “My Account” located under your profile name, top right in the navigation bar.
- Select “Two-factor authentication” and then click on “Activate”.
- You will now receive a Transaction Authentication Number (TAN) sent to the e-mail address connected to your account.
- Enter this TAN and then click on “Next”.
- You are then led to activation by way of a QR Code for use through your Authenticator App.
- You will then be asked to enter the confirmation code from your App to complete the process.
Once you have completed the process, you are presented with a one-off “Emergency code”. Please write this down and keep it safe! This can help you deactivate the two factor authentication should you lose your phone or have a problem with your Authenticator App.
Deactivating two-factor authentication
You can deactivate two-factor authentication in two ways:
Deactivate over your profile settings
- Log in to your Laplink Everywhere account at everywhere.laplink.com/login.
- Go to “My Account” located under your profile name, top right in the navigation bar.
- Select “Two-factor authentication” and then click on “Deactivate”.
- You will now receive a Transaction Authentication Number (TAN) sent to the e-mail address connected to your account.
- Enter this TAN and then click on “Next” to deactivate.
Deactivate with the Emergency Code
- Log in to your Laplink Everywhere account at everywhere.laplink.com/login.
- After you have entered your username and password, you will be prompted to enter a security code from your Authenticator App.
- Select “I can’t use my authentication app.”
- Now enter your one-off “Emergency code” to deactivate two-factor authentication.
The two-factor authentication is now deactivated. You can activate it again at any time by following the instructions above.
Getting Started
At the moment, Laplink Everywhere can do the following:
- Detect information about hardware, especially level of usage on hard drives, SSDs, and other disks
- Monitor the condition of PCs (online/offline, health status of hard disks, etc.)
- Software inventory
- Monitor processes and USB disks
- Check and monitor Windows Security as well as Microsoft updates
- Remote Desktop and Remote Console in browser
This requires the Laplink Everywhere Client software being installed one time only on the computer. Afterwards, the software is updated automatically. An easy-to-use web app allows you to use the software on any browser and device (even on smartphones or tablets).
We’re currently at work on integrating additional apps into Laplink Everywhere. That’s why we’ll be very grateful for any feedback and suggestions you might have.
Installing Laplink Everywhere is very easy:
- Download and install the Client app
- Add computer to your Laplink Everywhere account
- Ready
Your Laplink Everywhere account can be created during installation or even beforehand. You’ll then be able to manage your computers in any web browser.
Client App
Laplink Everywhere can be used on any Windows system starting from Windows 8.1 and Windows 2012 Server (R2). Microsoft .NET 4.0 Framework is required. This is available free of charge and can be installed automatically if not already in use. Administrative permissions are required for installation.
There are no special hardware requirements, so Laplink Everywhere can be installed on any system running the Windows versions mentioned above.
Laplink Everywhere also supports virtual machines such as Microsoft Hyper-V, VMware, Microsoft VPC and Oracle VirtualBox.
Web App
You can access Laplink Everywhere with any browser on any device (PC, smartphone, Tablet) that has access to the internet. To log in, use your e-mail address and the password you created.
Apps
Apps combine types of information or features. Laplink Everywhere already contains a number of apps that provide information about the computer’s status quickly and easily. These apps also allow for partial control of the various components. Typical apps are Software, Hard Disk Drives, Remote Desktop, etc.
In accordance with the license, different apps are available. Premium-type apps providing additional or advanced features are also available for a modest fee. These modules can be ordered as needed.
Apps can be deactivated as desired so that the associated system information is no longer requested or the appropriate function is rendered unavailable.
To activate, deactivate or reactivate an app, simply select the appropriate computer and click on the Settings symbol (a cog wheel positioned top right over the Computer Information). The Settings page displays all available apps which can then be turned on or off using the slide control.
Security
Yes. data between the Laplink Everywhere Client and our servers is transferred using SSL encryption so that there’s no possibility of unauthorized access to any data. We also use additional methods to protect communication.
All data from Laplink Everywhere is saved on our secure server at company headquarters in Bellevue, Washington.
Laplink Everywhere saves system information in order to display the current status of a computer and provide a diagnosis for possible problems. It does not save any personal files, documents, or graphic data. When using the Remote Desktop, image data will be transferred to our server encrypted and saved only for the duration of the transmission. There is never any permanent storage of image data.
Please read more about data security in our Privacy Policy as well as in our Terms and Conditions. We will be happy to help with any additional questions you may have!
Sign Up
Registration for Laplink Everywhere requires only a valid e-mail address. Once you provide it, you’ll be sent a confirmation and must create a password. You’ll then be able to download the Laplink Everywhere Client installation and add as many computers as you like to your account.
Register here. Registration is free of charge and without any obligations.
Settings
Sign in to your Laplink Everywhere account and click the top right on your account name. Select from the “Notifications” list. This takes you to your individual notification settings. Here is an example of notification selections:
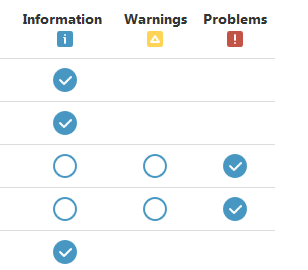
You can select per app whether to be notified of problems only or also of warnings and information. Simply click on the appropriate checkbox next to the app in question to either activate the notification or to turn it off. Note that not every app contains all types of events (Information, Warnings, Problems) so please be aware that selections can be limited on occasion.
All notifications are also logged and saved so you can check them in the History as well as in your notification e-mails.
Laplink Everywhere can be uninstalled via the Windows Control Panel just like any other Windows program. The computer will, however, remain in the your Laplink Everywhere account chronology just in case you wish to access the historical data of that no-longer connected computer at some point. Of course you are also free to simply delete the computer in its entirety from your account using the product menu if you no longer wish to keep its LE logged data either.
In a Company
Our customers have a very easy way to roll out Laplink Everywhere on all company computers. To do this, we provide a personalized MSI file in your account that can then be installed on all systems using group policies.
You can find a complete description of how this feature works on page “How to deploy Laplink Everywhere using Group Policies”.
PowerShell
To use a PowerShell script on multiple computers simultaneously, please do the following:
- Select a computer in your account that enabled the PowerShell app. Click the PowerShell app there and switch to the Script Library (above right button).
- In the Library, select the script you want to use on the computer. This will bring you into editing mode.
- Below right you’ll see a button “Add computer”. Click it.
- In the following menu, you can select the computer you want by choosing individual ones (holding the Ctrl key) or entire sections (holding the Shift key).
- Select in the Execution listbox “Manual execution – run now” and click “Add”
The script will then be added to all the computers and run immediately. You can also set up a schedule for running the script if so desired. To do this, select another option in the Execution listbox.
Actually, PowerShell works in Laplink Everywhere just as if you were working directly on the computer. In addition, Laplink Everywhere offers an evaluation of the outcome of the PowerShell script and scheduling (a feature you may know from Linux crontab). This makes it possible to execute PowerShell scripts at specific times without having to use the Windows Task Scheduler.
With the help of the PowerShell scripting app, you are no longer bound to the restrictions of popular IT monitoring solutions. It is finally possible to customize and extend your desired tasks in line with your IT monitoring!
PowerShell is available in different versions. You may check the Laplink Everywhere Dashboard to find out which version is installed on your system. In essence:
- Version 1.0 is obsolete and should no longer be used
- Version 2.0 is pre-installed by default in Windows 7. It can be downloaded and installed free of charge for Windows XP, Windows Server 2003 and Windows Vista.
- Version 3.0 is standard since Windows 8 was released. It is also available for Windows 7 SP1 and Windows Server 2008 R2 SP1.
- Version 4.0 is the current version and can be installed as a component of Windows Management Framework 4.0.
Note that the different versions have partly different syntax and functions, meaning that adjustments to the scripts for each version may be necessary.
PowerShell scripts can be fully managed in Laplink Everywhere via the web application. You can create, edit, activate and deactivate, as well as delete scripts. In other words, you are able to create, edit and see the results of a script for one of your computers from virtually anywhere in the world. Scripts that you have created once can also be applied to any other computer.
Each script provides a result value (a so-called exit code) at the end. This value influences the status of your computer and is interpreted as follows:
- exit 0 (or no exit code was delivered): Status OK (green)
- exit 1: Status warning (yellow)
- exit 2 or greater: Status problem (red)
At the same time, the latest issue line of your script is up to 2,048 characters long and stored and recorded in the history of your computer. Of course, you can subscribe to an alert that sends you the exit code and that issue via mail; that way, you can see immediately if an automated script signals a warning or a problem.
Executing scripts is possible as follows:
- Manually – manual execution using Laplink Everywhere
- Automatically during system start – the script runs at each system startup
- Automatically at certain times – the times can be specified using crontab-Syntax
Syntax of scheduling
If the user-defined execution is enabled, the scripts can be run automatically. The line consists of the following 5 fields:
[Minutes] [Hours] [Days] [Months] [Weekdays]
Definition of fields
| Field | Valid values | Notes |
|---|---|---|
| Minutes | 0...59 | * for each minute | |
| Hours | 0...23 | * for each hour | |
| Days | 1...31 | * for each day | If days and weekdays are used together, they are not evaluated together but individually (see exception on examples) |
| Months | 1...12 | * for each month | |
| Weekdays | 0...7 | * for each weekday | 0 or 7 stand for Sunday |
Examples for scheduling with Laplink Everywhere
| [Minutes] | [Hours] | [Days] | [Months] | [Weekdays] | Explanation |
|---|---|---|---|---|---|
| 10 | 0 | * | * | * | Each day ten minutes to midnight. |
| 10 | 0 | * | * | 3 | Each Wednesday ten minutes to midnight. |
| 0 | * | * | * | * | Every day on each full hour |
| */15 | 4-16 | * | * | 6,7 | Every 15 minutes between 4 a.m. and 4 p.m. on Saturday and Sunday. |
| * | * | * | * | * | Every minute (minimal setting option) |
| * | 14 | 1-10 | 5 | 1 | On May 1 to 10 and on each Monday in May at 2 p.m.; This is an exception, when days and weekdays are used together |
Using Laplink Everywhere for free
Yes, it’s really free. You are under no obligation and can of course stop using it at any time. In addition, with the optional fee-based Premium apps and Premium and Enterprise Edition, you can further expand the functionality of Laplink Everywhere.
Yes, LE may be used privately or by companies and organizations in a corporate environment.
The Free version allows up to 10 endpoints to be managed. With the Premium and Enterprise Editions, the number is unlimited. With respect to our Fair Use Policy, we do request however that you contact us if you plan to use Laplink Everywhere on more than 10,000 endpoints. This way we can ensure and reserve the necessary amount of server capacity.
Need a large scale solution?

Save hours of IT time and resources throughout your PC hardware and OS refreshes with PCmover Enterprise.
Enterprises and large organizations can save over $300 per PC migrated on both hard and soft costs when using PCmover. It's Microsoft's only recommended migration solution that can be used for all types of transfer scenarios - break/fix, ongoing PC and OS refreshes for any size network.
40
Over 40 Years Of Experience
With roots reaching back to the days of MS DOS, we've seen every transfer scenario imaginable. From small issues to the biggest IT nightmares, PCmover can help.